Using Shaders in Half-Life 2
By: Marco Bouterse- Getting Started
- Compiling the Sourcecode
- Installing Necessary Tools
- Compiling the Sample Shaders
- Testing the Sample Shaders
- Editing the Sample Shaders
- Enabling Postprocessing Effects
- Creating Postprocessing Effects
- Creating New Shaders
- Using Textures and Variables
- References
The first step in modifying shaders on the Half-Life 2 platform is to install a fresh copy of the source code. Start up the Source SDK and choose "Create a Mod". Next choose "Modify Half-Life 2 Multiplayer". Enter a directory for your mod, make sure this path does NOT contain spaces (this might give problems when running some scripts later on). Enter a name for the mod and click next. The files will be copied.
Compiling the Sourcecode
After the files are copied, move to the path you have entered during installing. I will refer to this directory as [mod dir]. There are 4 folders and four scripts in this directory. Go into the \src directory, there you will find two Visual Studio .Net 2003 solution files. Open the file game_sdk.sln in Visual Studio. In the configuration manager (build menu) set the active configuration to "Release HL2MP". If you are using Visual Studio 2005 follow the instructions on this webpage. You must have the DirectX SDK installed. Also you might need Microsoft .NET Framework 1.1 and the Microsoft Platform SDK. Hit the build icon (or press F7) to compile and link the sourcecode. Go to your mod's directory and run the run_mod.bat script. If it works the source was succesfully compiled.
Installing Necessary Tools
To be able to compile and use shaders in your mod, you have to install or copy a couple of tools from different places on your computer. You must have installed Perl and the DirectX SDK.
Copy the following files (create destination dirs if they don't exist):
| Needed Utility | Destination Directory |
[Perl]\bin\perl.exe | [mod dir]\src\devtools\bin\ |
[Perl]\bin\perl58.dll | [mod dir]\src\devtools\bin\ |
[DXSDK]\utilities\fxc.exe | [mod dir]\src\dx9sdk\utilities\ |
[DXSDK]\utilities\psa.exe | [mod dir]\src\dx9sdk\utilities\ |
[DXSDK]\utilities\vsa.exe | [mod dir]\src\dx9sdk\utilities\ |
[Visual Studio]\Vc7\nmake.exe | [mod dir]\src\sdkshaders\ |
Compiling the Sample Shaders
The source code comes with a couple of sample shaders to show their usage. To compile these you have to open a Command Prompt and cd to [mod dir]\src\sdkshaders. Enter the following command:
build_sample_shaders.bat -game "[Steam dir]\SteamApps\SourceMods\[mod name]"Where [Steam dir] is the location of Steam on your harddisk (C:\Program Files\Valve\Steam for example) and [mod name] is the name you gave your mod when you installed the sourcecode. If you execute this command you should see after a while that the script has written and copied 6 files. These files are 3 vertex and 3 pixel shaders that are compiled into the \src\sdkshaders\shaders directory of your mod. Open the file game_shader_generic_sample.vcproj in the \src\sdkshaders directory in Visual Studio and build it. This will build the C++ part of the shader and create a .dll that will be stored with client.dll and server.dll in the [Steam dir]\SteamApps\SourceMods\[mod name]\bin directory.
Testing the Sample Shaders
Before you can see the sample shaders at work, you have to copy a few more files:
| Needed File | Destination Directory |
[account]\half-life 2\hl2\maps\sdk_shader_samples.bsp | ..\SourceMods\[mod name]\maps\ |
[account]\sourcesdk_content\hl2\mapsrc\sdk_shader_samples.vmf | [mod dir]\mapsrc\ |
[account]\half-life 2\hl2\materials\SDK\sdk_lightmap.vmt | ..\SourceMods\[modname]\materials\sdk\ |
[account]\half-life 2\hl2\materials\SDK\sdk_particle.vmt | ..\SourceMods\[modname]\materials\sdk\ |
[account]\half-life 2\hl2\materials\SDK\sdk_postprocess.vmt | ..\SourceMods\[modname]\materials\sdk\ |
Where [account] stands for the account directory that is in [Steam]\SteamApps\
Now you can run the mod again by starting run_mod.bat. When the game has loaded type:
map sdk_shader_samplesin the console and press enter. The shader samples map will now be loaded, displaying a textured cube and a smoke effect.
Editing the Sample Shaders
Editing the sample shaders is very easy if you're familiar with shader programming in HLSL. The HLSL source code is contained in .fxc files in the [mod dir]\src\sdkshaders directory. For example the pixel shader code for the lightmapped cube is in sdk_lightmap_ps20.fxc. To edit this shader, open it in wordpad and make changes. For example change the last line
return baseColor;to
return float4(1.0f, 0.0f, 0.0f, 1.0f);. This will output a red color for all pixels. To view the change, you have to compile the shader again by running build_sample_shaders.bat (see above under 'Compiling the Sample Shaders'). After the shader is compiled you can start the mod again with run_mod.bat. When the game is loaded, load the sdk_sample_shaders map and the cube will be red! To edit the smoke you must open sdk_particle_ps11.fxc or sdk_particle_vs11.fxc. For example to make it blue, add the line
vOutput.rg = 0.0f;right before
return vOutput;in the pixel shader. This will set the red and green components of the smoke to 0, effectively making the smoke appear blue. The screenshots below show the appearance of the shaders before and after editing.
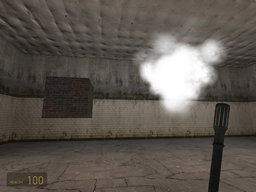 The Original Shaders |
 After Editing... |
Enabling Postprocessing Effects
Postprocessing effects are applied to each frame before it is displayed and affect the entire screen. The sample shaders contain a shader that is capable of postprocessing effects, but before it works, you need to modify the sourcecode a bit. Open the file sdk_postprocess.cpp and look for the code that is commented out (right after the #include statements). This code needs to be copied into the mod's source code to enable postprocessing. Open game_sdk.sln in [mod dir]\src and find the file view_scene.cpp (under client->source files). Find the function CViewRender::RenderView(...) and scroll down to the end of the function. Copy the code from sdk_postprocess.cpp to the end of this function right under the command "GenerateOverdrawForTesting();". Build the client and run your mod again. Load any map and watch the result (which should be quite obvious):
 The default postprocessing effect (map: dm_lockdown) |
Now that we have a postprocessing shader, we can edit it to apply our own screen filters. This works the same way as editing the other sample shaders: Open the file - Edit the HLSL code - Compile the shader - Run the mod. The files to edit in this case are sdk_postprocess_vs20.fxc and sdk_postprocess_ps20.fxc. The following effects are all accomplished by editing the sdk_postprocess_ps20.fxc file. Click on a screenshot to view the HLSL sourcecode of the fxc file for that effect.
 Pure Black & White |
 Greyscale |
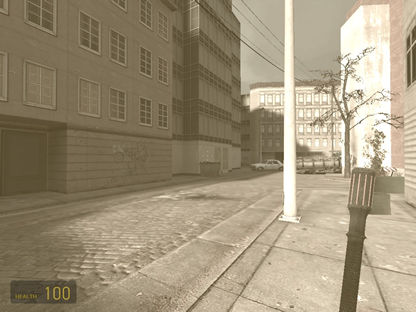 Sepia |
 Thermal |
Creating New Shaders
Instead of editing existing shaders it is also possible to create your own shaders from scratch. This requires some C++ and HLSL programming. Start by creating two new files inside the [mod dir]\src\sdkshaders directory called simpleshader_vs11.fxc and simpleshader_ps11.fxc. The suffix _vs11 stands for vertex shader model 1.1, you can also use model 2.0 with the suffix _vs20. The pixel shader can have the suffix _ps11 or _ps20. These files will contain the HLSL code for vertex and pixel shader. Open simpleshader_vs11.fxc in WordPad / NotePad (or any text editor) and write the following vertex shader code:
/* Always include this file*/
#include "common_vs_fxc.h"

/* The input of this vertex shader */
struct VS_INPUT
{
	float3 vPos	: POSITION;
};

/* The output of this vertex shader */
struct VS_OUTPUT
{
    	float4 vProjPos : POSITION;
};

/* main function */
VS_OUTPUT main( const VS_INPUT input )
{
	/* initialize output structure */
	VS_OUTPUT o = ( VS_OUTPUT )0;

	/* Project the point. (multiply with model-view-projection matrix) */
	o.vProjPos = mul( float4( input.vPos, 1 ), cModelViewProj );

	/* Return output */
	return o;
}
This is the bare minimum of a vertex shader. All it does is multiplying the position of an incoming vertex by the model-view-projection matrix (effectively transforming it to the correct position).The pixel shader is even more basic. Open simpleshader_ps11.fxc and type:
/* Always include this file*/
#include "common_ps_fxc.h"

HALF4 main() : COLOR
{
	/* Output constant green color */
	return float4(0.0f, 1.0f, 0.0f, 1.0f);
}
The pixel shader has no input and outputs a single constant green color. Now that the HLSL code is ready, it needs to be compiled. This works the same as compiling the sample shaders. But first the new files must be added to sdk_shaders.txt. Open this file and add simpleshader_vs11.fxc and simpleshader_ps11.fxc to the end of the list. Run build_sample_shaders.bat (as described under Compiling the Sample shaders). If there are no errors this script will generate the files simpleshader_vs11.inc and simpleshader_ps11.inc and put them in the fxctmp9 directory (in [mod dir]\src\sdkshaders).Now the C++ part must be created to make the new shader available to the game engine. Open game_shader_generic_sample.sln (or .vcproj) in Visual Studio. Add a new file to the Source Files: simpleshader.cpp and write the following code:
/* Include important files */
#include "BaseVSShader.h"
#include "convar.h"

// Note: you have to run buildshaders.bat to generate these files from the FXC code.
#include "simpleshader_ps11.inc"
#include "simpleshader_vs11.inc"

/* Start of Shader setup */
BEGIN_VS_SHADER( SimpleShader, "Help for SimpleShader: this shader produces a green color" )

	/* This shader doesn't use parameters*/
	BEGIN_SHADER_PARAMS
	END_SHADER_PARAMS

	// Set up anything that is necessary to make decisions in SHADER_FALLBACK.
	SHADER_INIT_PARAMS()
	{
	}

	/* This is used for providing fallback for lower versions of DirectX */
	SHADER_FALLBACK
	{
		return 0;
	}

	/* Initialize parameters */
	SHADER_INIT
	{
	}

	/* This is where the shader is invoked */
	SHADER_DRAW
	{
		/* Shadow state is executed once per material */
		SHADOW_STATE
		{
			/* Setup stream format - we only need the position */
			int fmt = VERTEX_POSITION;
			pShaderShadow->VertexShaderVertexFormat( fmt, 0, 0, 0, 0 );

			/* Pick the shaders you want to use */
			simpleshader_vs11_Static_Index vshIndex;
			pShaderShadow->SetVertexShader( "simpleshader_vs11", vshIndex.GetIndex() );

			simpleshader_ps11_Static_Index pshIndex;
			pShaderShadow->SetPixelShader( "simpleshader_ps11", pshIndex.GetIndex() );

			DefaultFog();
		}
		/* Pass dynamic parameters that can change over time */
		DYNAMIC_STATE
		{
		}

		/* Execute shader */
		Draw();
	}
END_SHADER
Build the project to update the DLL so it includes your shader. You can now use your shader in a material file (See Material System for more information). Create a new VMT file (SimpleShader.vmt) in the [Steam]\SteamApps\SourceMods\[mod name]\materials\ directory with the following contents:
"SimpleShader"
{
}
SimpleShader is the name of this shader and was defined with the BEGIN_VS_SHADER(..) macro in the C++ file.Now you can create a level in the Hammer editor and use the SimpleShader material on some object. Run the level and the object should be green.
Using Textures and Variables
A shader that outputs a single constant color is not really interesting nor useful. This section will explain how to access textures and variables inside a shader to achieve more interesting effects. Start by creating a new shader using the steps described above. Use the following filenames (you can use others, as long as they are consistent):
textureshader_vs20.fxc
textureshader_ps20.fxc
textureshader.cpp
textureshader.vmt
Here is the code for the vertex shader, the new lines are in bold:
/* Always include this file*/
#include "common_vs_fxc.h"

/* Extern variable */
float fSinTime : register (SHADER_SPECIFIC_CONST_0); //read a variable from register location

/* The input of this vertex shader */
struct VS_INPUT
{
	float3 vPos	: POSITION;
	float2 vTexCoord : TEXCOORD0; //read a pair of texture coordinates from the vertex
};

/* The output of this vertex shader */
struct VS_OUTPUT
{
    	float4 vProjPos : POSITION;
	float2 vTexCoord : TEXCOORD0;	 //pass texture coordinates to pixel shader
};

/* main function */
VS_OUTPUT main( const VS_INPUT input )
{
	/* initialize output structure */
	VS_OUTPUT output = ( VS_OUTPUT )0;

	/* Project the point. (multiply with model-view-projection matrix) */
	output.vProjPos = mul( float4( input.vPos, 1 ), cModelViewProj );

	/* Pass texture coordinates to pixel shader */
	output.vTexCoord.x = input.vTexCoord.x + fSinTime;
	output.vTexCoord.y = input.vTexCoord.y + fSinTime; //offset the texture coordinates using the variable

	/* Return output */
	return output;
}
And the pixel shader should look like this:
/* Always include this file*/
#include "common_ps_fxc.h"

/* Get texture */
sampler BaseTexture : register ( s0 ); //read texture from register location

HALF4 main(float2 TexCoord : TEXCOORD0) : COLOR //takes texture coordinates as input
{
	/* Output texture color */
	return tex2D(BaseTexture, TexCoord); //return texel at tex coordinates location
}
This shader uses a variable to offset the texture coordinates and a texture to lookup colors. To be able to access these variables, they must be set up in the C++ code. Compile the fxc files and open textureshader.cpp in Visual Studio. In the SHADER_INIT section add the following line:
LoadTexture( BASETEXTURE );This will take care of loading the texture that we will specify later on in the VMT file. In the SHADOW_STATE section, replace the first two lines (the vertex format setup) by this code:
pShaderShadow->EnableTexture( SHADER_TEXTURE_STAGE0, true );

int fmt = VERTEX_POSITION;
pShaderShadow->VertexShaderVertexFormat( fmt, 1, 0, 0, 0 );
This will enable the texture and adds a pair of texture coordinates to the vertex format (which we use in the shader). Finally insert the following code inside the DYNAMIC_STATE section:
BindTexture( SHADER_TEXTURE_STAGE0, BASETEXTURE, FRAME );

float sin_time;

sin_time = sin((timeGetTime()/1000.0f));
pShaderAPI->SetVertexShaderConstant( VERTEX_SHADER_SHADER_SPECIFIC_CONST_0, &sin_time );
It takes care of binding the correct texture and passing the variable to the vertex shader. The variable is the sinus of the time in seconds and will vary between -1.0 and 1.0 over time. In the shader it is used to offset the texture coordinates resulting in an animated texture. To be able to use the timeGetTime() function in your code it is necessary to add "include
Build the project to make the shader usable. The final step is to create a material file that uses this shader correctly. It should look something like this:
"TextureShader"
{
	$baseTexture "brick/brickwall045a"
}
Use the material on a test object in some level and run it to view the results. You should see a texture that moves back and forth along the diagonal.
References