1 Intro 2 Concepts 3 Nodes 4 Fields/Events 5 Conformance
A Grammar B Java C JavaScript D Examples E Related Info References
Quick Java Quick JavaScript Quick Nodes
|
|
1 Intro 2 Concepts 3 Nodes 4 Fields/Events 5 Conformance A Grammar B Java C JavaScript D Examples E Related Info References Quick Java Quick JavaScript Quick Nodes |
|
|
Chapter
2
2.2 Overview 2.3 UTF-8 syntax 2.4 Scene graph 2.5 VRML & WWW 2.6 Nodes 2.7 Field, eventIn, 2.8 PROTO 2.9 EXTERNPROTO 2.10 Events 2.11 Time 2.12 Scripting 2.13 Navigation 2.14 Lighting |
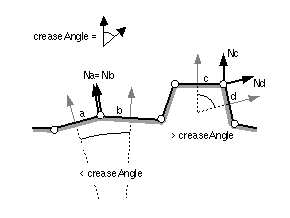 Figure 2-4: creaseAngle Field
Figure 2-5: Grouping Node
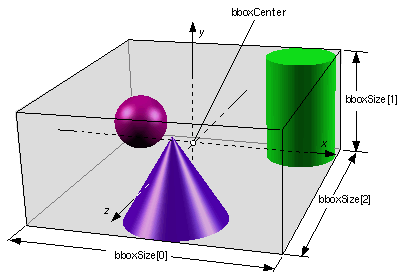
Bounding Boxes
|
| TECHNICAL
NOTE: Prespecified
bounding boxes help browsers do two things: avoid loading parts
of the world from across the network and avoid simulating parts
of the world that can't be sensed. Both of these rely on the
"out-of-sight-out-of-mind" principle: If the user
cannot see or hear part of the world, then there's no reason
for the VRML browser to spend any time loading or simulating
that part of the world.
For many operations, a VRML browser can automatically calculate bounding volumes and automatically optimize away parts of the scene that aren't perceptible. For example, even if you do not prespecify bounding boxes in your VRML world, browsers can compute the bounding box for each part of the world and then avoid drawing the parts of the scene that are not visible. Since computing a bounding box for part of the world is almost always faster than drawing it, if parts of the world are not visible (which is usually the case), then doing this "render culling" will speed up the total time it takes to draw the world. Again, this can be done automatically and should not require that you prespecify bounding boxes. However, some operations cannot be automatically optimized in this way because they suffer from a "chicken-and-egg" problem: The operation could be avoided if the bounding box is known, but to calculate the bounding box requires that the operation be -performed! Delaying loading parts of the world (specified using either the Inline node or an EXTERNPROTO definition) that are not perceptible falls into this category. If the bounding box of those parts of the world is known, then the browser will know if those parts of the world might be perceptible. However, the bounding box cannot be automatically calculated until those parts of the world are loaded. One possible solution would be to augment the standard Web protocols (such as HTTP) to support a "get bounding box" request; then, instead of asking for an entire .wrl file to be loaded, a VRML browser could just ask the server to send it the bounding box of the .wrl file. Perhaps, eventually, Web servers will support such requests, but until VRML becomes ubiquitous it is unlikely there will be enough demand on server vendors to add VRML-specific features. Also, often the network bottleneck is not transferring the data, but just establishing a connection with a server, and this solution could worsen that bottleneck since it might require two connections (once for the bounding box information and once for the actual data) for each perceptible part of the world. Extending Web servers to give bounding box information would not help avoiding simulating parts of the world that aren't perceptible, either. Imagine a VRML world that contained a toy train set with a train that constantly traveled around the tracks. If the user is not looking at the train set, then there is no reason the VRML browser should spend any time simulating the movement of the train (which could be arbitrarily complicated and might involve movement of the train's wheels, engine, etc.). But the browser can't determine if the train is visible unless it knows where the train is; and it won't know exactly where the train is unless it has simulated its movement, which is exactly the work we hoped to avoid. The solution is for the world creator to give the VRML browser some extra information in the form of an assertion about what might possibly happen. In the case of the toy train set, the user can give a maximum possible bounding box for the train that surrounds all the possible movements of the train. Note that if the VRML browser could determine all the possible movements of the train, then it could also do this calculation. However, calculating all possible movements can be very complicated and is often not possible at all because the movements might be controlled by an arbitrary program contained in a Script node. Usually it is much easier for the world creator (whether a computer program or a human being) to tell the browser the maximum possible extent of things. Note also that the world's hierarchy can be put to very good use to help the browser minimize work. For example, it is common that an object have both a "large" motion through the world and "small" motions of the object's parts (e.g., a toy train moves along its tracks through the world, but may have myriad small motions of its wheels, engine, drive rods, etc.). If the object is modeled this way and appropriate maximum bounding boxes are specified, then a browser may be able to optimize away the simulation of the small motions after it simulates the large motion and determines that the object as a whole cannot be seen. Once set, maximum bounding boxes cannot be changed. A maximum bounding box specification is an assertion; allowing the assertion to change over time makes implementations that rely on the assertion more complicated. The argument for allowing maximum bounding boxes to be changed is that the world author can often easily compute the bounding box for changing objects and thus offload the VRML browser from the work. However, this would require the VRML browser to execute the code continually to calculate the bounding box. It might be better to extend the notion of a bounding box to the more general notion of a bounding box that is valid until a given time. World authors could give assertions about an object's possible location over a specific interval of time, and the browser would only need to query the world-/creator-defined Script after that time interval had elapsed. In any case, experimentation with either approach is possible by extending a browser with additional nodes defined with the EXTERNPROTO extension mechanism (see Section 2.8, Browser Extensions). |
2.6.5 Grouping and children nodes
Grouping nodes have a children field that contains a list of nodes (exceptions to this rule are Inline, LOD, and Switch). Each grouping node defines a coordinate space for its children. This coordinate space is relative to the coordinate space of the node of which the group node is a child. Such a node is called a parent node. This means that transformations accumulate down the scene graph hierarchy.
The following node types are grouping nodes:
The following node types are children nodes:
The following node types are not valid as children nodes:
|
|
|
| TECHNICAL
NOTE: Unlike
VRML 1.0, the VRML 2.0 scene graph serves only as a transformation
and -spatial-grouping hierarchy. The transformation hierarchy allows
the creation of jointed, rigid-body motion figures. The transformation
hierarchy is also often used for spatial grouping. Tables and chairs
can be defined in their own coordinate systems, grouped to form
a set that can be moved around a house, which in turn is defined
in its own coordinate system and grouped with other houses to create
a neighborhood. Grouping things in this way is not only convenient,
it also improves performance in most -implementations.
The VRML 1.0 scene graph also defined an object property hierarchy. For example, a texture property could be placed at any level of the scene hierarchy and could affect an entire subtree of the hierarchy. VRML 2.0 puts all properties inside the hierarchy's lowest level nodes—a texture property cannot be associated with a grouping node; it can only be associated with one or more Shape nodes. This simplified scene graph structure is probably the biggest difference between VRML 1.0 and VRML 2.0, and was motivated by feedback from several different implementors. Some rendering libraries have a simpler notion of rendering state than VRML 1.0, and the mismatch between these libraries and VRML was causing performance problems and implementation complexity. VRML 2.0's ability to change the values and topology of the scene graph over time makes it even more critical for the scene graph structure to match existing rendering libraries. It is fairly easy to convert a VRML file to the structure expected by a rendering library once; it is much more difficult to come up with a conversion scheme that efficiently handles a constantly changing scene. VRML 2.0's simpler structure means that each part of the scene graph is almost completely self-contained. An implementation can render any part of the scene graph if it knows:
For example, this makes it much easier for an implementation to render different parts of the scene graph at the same time or to rearrange the order in which it decides to render the scene (e.g., to group objects that use the same texture map, which is faster on some graphics hardware). |
All grouping nodes also have addChildren and removeChildren eventIn definitions. The addChildren event appends nodes to the grouping node's children field. Any nodes passed to the addChildren event that are already in the group's children list are ignored. For example, if the children field contains the nodes Q, L and S (in order) and the group receives an addChildren eventIn containing (in order) nodes A, L, and Z, the result is a children field containing (in order) nodes Q, L, S, A, and Z.
The removeChildren event removes nodes from the grouping node's children field. Any nodes in the removeChildren event that are not in the grouping node's children list are ignored. If the children field contains the nodes Q, L, S, A and Z and it receives a removeChildren eventIn containing nodes A, L, and Z, the result is Q, S.
The Inline, Switch and LOD nodes are special group nodes that do not have all of the semantics of the regular grouping nodes (see "3.25 Inline", "3.26 LOD", and "3.46 Switch" for specifics).
| TECHNICAL NOTE: The order of a grouping node's children has no effect on the perceivable result; the children can be rearranged and there will be no change to the VRML world. This was a conscious design decision that simplifies the Open Inventor scene graph by eliminating most of the traversal state and enabling easier integration with rendering libraries (very few rendering libraries today support Inventor's rich traversal state). The net effect of this decision is smaller and simpler implementations, but more burden on the author to share attributes in the scene graph. It is important to note that the order of children is deterministic and cannot be altered by the implementation, since Script nodes may access children and assume that the order does not change. |
| TECHNICAL NOTE: The LOD and Switch nodes are not considered grouping nodes because they have different semantics from the grouping nodes. Grouping nodes display all of their children, and the order of children for a grouping node is unimportant, while Switch and LOD display, at most, one of their "children" and their order is very important. |
Note that a variety of node types reference other node types through fields. Some of these are parent-child relationships, while others are not (there are node-specific semantics). Table 2-3 lists all node types that reference other nodes through fields.
Table 2-3: Nodes with SFNode or MFNode fields
Node Type Field Anchor children Valid children nodes Appearance material Material texture ImageTexture, MovieTexture, Pixel Texture Billboard children Valid children nodes Collision children Valid children nodes ElevationGrid color Color normal Normal texCoord TextureCoordinate Group children Valid children nodes IndexedFaceSet color Color coord Coordinate normal Normal texCoord TextureCoordinate IndexedLineSet color Color coord Coordinate LOD level Valid children nodes Shape appearance Appearance geometry Box, Cone, Cylinder, ElevationGrid, Extrusion, IndexedFaceSet, IndexedLineSet, PointSet, Sphere, Text Sound source AudioClip, MovieTexture Switch choice Valid children nodes Text fontStyle FontStyle Transform children Valid children nodes
2.6.6 Light sources
Shape nodes are illuminated by the sum of all of the lights in the world that affect them. This includes the contribution of both the direct and ambient illumination from light sources. Ambient illumination results from the scattering and reflection of light originally emitted directly by light sources. The amount of ambient light is associated with the individual lights in the scene. This is a gross approximation to how ambient reflection actually occurs in nature.
| TECHNICAL NOTE: The VRML lighting model is a gross approximation of how lighting actually occurs in nature. It is a compromise between speed and accuracy, with more emphasis put on speed. A more physically accurate lighting model would require extra lighting calculations and result in slower rendering. VRML's lighting model is similar to those used by current computer graphics software and hardware. |
| TECHNICAL NOTE: The LOD and Switch nodes are not considered grouping nodes because they have different semantics from the grouping nodes. Grouping nodes display all of their children, and the order of children for a grouping node is unimportant, while Switch and LOD display, at most, one of their "children" and their order is very important. |
The following node types are light source nodes:
All light source nodes contain an intensity, a color, and an ambientIntensity field. The intensity field specifies the brightness of the direct emission from the light, and the ambientIntensity specifies the intensity of the ambient emission from the light. Light intensity may range from 0.0 (no light emission) to 1.0 (full intensity). The color field specifies the spectral colour properties of the both direct and ambient light emission, as an RGB value.
|
TECHNICAL NOTE: The intensity field is really a convenience; adjusting the RGB values in the color field appropriately is equivalent to changing the intensity of the light. Or, in other words, the light emitted by a light source is equal to intensity × color. Similarly, setting the on field to FALSE is equivalent to setting the intensity and ambientIntensity fields to zero. Some photorealistic rendering systems allow light sinks — light sources with a negative intensity. They also sometimes support intensities of greater than 1.0. Interactive rendering libraries typically don't support those features, and since VRML is designed for interactive playback the specification only defines results for values in the 0.0 to 1.0 range. |
PointLight and SpotLight illuminate all objects in the world that fall within their volume of lighting influence regardless of location within the file. PointLight defines this volume of influence as a sphere centred at the light (defined by a radius). SpotLight defines the volume of influence as a solid angle defined by a radius and a cutoff angle. DirectionalLights illuminate only the objects descended from the light's parent grouping node, including any descendent children of the parent grouping nodes.
|
TECHNICAL NOTE: A good light source specification is difficult to design. There are two primary problems: first, how to scope light sources so that the "infinitely scalable" property of VRML is maintained and second, how to specify both the light's coordinate system and the objects that it illuminates. If light sources are not scoped in some way, then a VRML world that contains a lot of light sources requires that all of the light sources be taken into account when drawing any part of the world. By scoping light sources, only a subset of the lights in the world ever need to be considered, allowing worlds to grow arbitrarily large. For PointLight and SpotLight, the scoping problem is addressed by giving them a radius of effect. Nothing outside of the radius is affected by the light. Implementors will be forced to approximate this ideal behavior, because current interactive rendering libraries typically only support light attenuation and do not support a fixed radius beyond which no light falls. Content creators should choose attenuation constants such that the intensity of a light source is very close to zero at the cutoff radius (or, alternatively, choose a cutoff radius based on the attenuation constants). A directional light sends parallel rays of light from a particular direction. Attenuation makes no sense for a directional light, since the light is not emanating from any particular location. Therefore, it makes no sense to try to specify a cutoff radius or any other spatial scoping. Instead, DirectionalLight is scoped by its position in the scene hierarchy, illuminating only sibling geometry (geometry underneath the same Group or Transform as the DirectionalLight). Although unrealistic, defining DirectionalLight this way allows efficient implementations and allows content creators a reasonable amount of control over the lighting of their virtual worlds. The second problem--defining the light's coordinate system separately from which objects the light illuminates--is addressed by the cutoff radius field of PointLight and SpotLight. Their position in the scene hierarchy determines only their location in space; they illuminate all objects that fall within the cutoff radius of that location. This makes implementing them more difficult, since the position of all point lights and spot lights must be known before anything is drawn. Current interactive rendering hardware and software make it even more difficult, since they support only a small number of light sources (e.g., eight) at once. Implementors can either turn light sources on and off as different pieces of geometry are drawn or can just use a few of the light sources and ignore the rest. The VRML 2.0 specification requires only that eight simultaneous light sources be supported (see Chapter 5, Conformance and Minimum Support Requirements). World creators should bear this in mind and minimize the number of light sources turned on at any given time. DirectionalLight does not attempt to decouple its position in the scene hierarchy from the objects that it illuminates. That can result in unrealistic behavior. For example, a directional light that illuminates everything inside a room will not illuminate an object that travels into the room unless that object is in the room's part of the scene hierarchy, and an object that moves outside the room will continue to be lit by the directional light until it is moved outside of the room Group. A better solution for moving objects around the scene hierarchy as their position in the virtual world changes may eventually be needed, but until then content creators will have to use existing mechanisms to get their desired results (e.g., by knowing the Group for each room in their virtual world and using addChildren/removeChildren events to move objects from one Group to another as they travel around the virtual world). |
2.6.7 Sensor nodes
2.6.7.1 Introduction to sensors
The following nodes types are sensor nodes:
- Anchor
- Collision
- CylinderSensor
- PlaneSensor
- ProximitySensor
- SphereSensor
- TimeSensor
- TouchSensor
- VisibilitySensor
Sensors are children nodes in the hierarchy and therefore may be parented by grouping nodes as described in "2.6.5 Grouping and children nodes."
| TECHNICAL
NOTE: They
are called sensors because they sense changes to something. Sensors
detect changes to the state of an input device (TouchSensor, CylinderSensor,
Plane-Sensor, SphereSensor), changes in time (TimeSensor), or changes
related to the motion of the viewer or objects in the virtual world
(ProximitySensor, VisibilitySensor, and Collision group).
Some often-requested features that did not make it into VRML 2.0 could be expressed as new sensor types. These are object-to-object collision detection, support for 3D input devices, and keyboard support. Viewer-object collision detection is supported by the Collision group, but object-to-object collision detection is harder to implement and much harder to specify. Only recently have robust, fast implementations for detecting collisions between any two objects in an arbitrary virtual world become available, and efficient algorithms for object-to-object collision detection is still an area of active research. Even assuming fast, efficient algorithms are widely available and reasonably straightforward to implement, it is difficult to specify precisely which nodes should be tested for collisions and what events should be produced when they collide. Designing a solution that works for a particular application (e.g., a game) is easy; designing a general solution that works for a wide range of applications is much harder. Support for input devices like 3D mice, 3D joysticks, and spatial trackers was also an often-requested feature. Ideally, a world creator would describe the desired interactions at a high level of abstraction so that users could use any input device they desired to interact with the world. There might be a Motion3DSensor that gives 3D positions and orientations in the local coordinate system, driven by whatever input device the user happened to be using. In practice, however, creating an easy-to-use experience requires knowledge of the capabilities and limitations of the input device being used. This is true even in the well-researched world of 2D input devices; drawing applications treat a pressure-sensitive tablet differently than a mouse. One alternative to creating a general sensor to support 3D input devices was to create many different sensors, one for each different device or class of devices. There were two problems with doing this: First, the authors of the VRML 2.0 specification are not experts in the subtleties of all of the various 3D input device technologies and second, it isn't clear that many world creators would use these new sensors since they would restrict the use of their worlds to people that had the appropriate input device (a very small percentage of computer users). It is expected that prototype extensions that -support 3D input devices will be available and proposed for future revisions of the VRML specification. Unlike 3D input devices, keyboards are ubiquitous in the computing world. However, there is no KeyboardSensor in the VRML 2.0 standard. Virtual reality purists might argue that this is a good thing since keyboards have no place in immersive virtual worlds (and we should have SpeechSensor and FingerSensor instead), but that isn't the reason for its absence from the VRML specification. During the process of designing KeyboardSensor several difficult design issues arose for which no satisfactory solution was found. In addition, VRML is not designed to be a stand-alone, do-everything standard. It was designed to take advantage of the other standards that have been defined for the Internet whenever possible, such as JPEG, MPEG, Java, HTTP, and URLs. The simplest keyboard support would be reporting key-press and key-release events. For example, a world creator might want a platform to move up while a certain key is pressed and to move down when another key is pressed. Or, different keys on the keyboard might be used to "teleport" the user to different locations in the world. Adding support for a single KeyboardSensor of this type in a world would be straightforward, but designing for just a single KeyboardSensor goes against the composability design goals for VRML. It also duplicates functionality that is better left to other standards. For example, Java defines a set of keyboard events that may be received by a Java applet. Rather than wasting time duplicating the functionality of Java inside VRML, defining a general communication mechanism between a Java applet and a VRML world will give this functionality and much more. Java also defines textArea and textField components that allow entry of arbitrary text strings. Designing the equivalent functionality for text input inside a 3D world (e.g., fill-in text areas on the walls of a room) would require the definition of a 2D windowing system inside the 3D world. Issues such as input methods for international characters, keyboard focus management, and a host of other issues would have to be reimplemented if a VRML solution were invented. Again, rather than wasting time duplicating the functionality of existing windowing systems, it might be better to define a general way of embedding existing 2D standards into the 3D world. Experimentation along these lines is certainly possible using the current VRML 2.0 standard. The ImageTexture node can point to arbitrary 2D content, and although only the PNG and JPEG image file formats are required, browser implementors could certainly support ImageTexture nodes that pointed to Java applets. They could even map mouse and keyboard events over the texture into the 2D coordinate space of the Java applet to support arbitrary interaction with Java applets pasted onto objects in a 3D world. |
Each type of sensor defines when an event is generated. The state of the scene graph after several sensors have generated events shall be as if each event is processed separately, in order. If sensors generate events at the same time, the state of the scene graph will be undefined if the results depend on the ordering of the events.
| TECHNICAL NOTE: Events generated by sensor nodes are given time stamps that specify exactly when the event occurred. These time stamps should be the exact or ideal time that the event occurred and not the time that the event happened to be generated by the sensor. For example, the time stamp for a TouchSensor's isActive TRUE event generated by clicking the mouse should be the actual time when the mouse button was pressed, even if it takes a few microseconds for the mouse-press event to be delivered to the VRML application. This isn't very important if events are handled in isolation, but can be critical in cases when the sequence or timing of multiple events is important. For example, the world creator might set a double-click threshold on an object. If the user clicks the mouse (or, more generally, activates the pointing device) twice rapidly enough, an animation is started. The browser may happen to receive one click just before it decides to rerender the scene and the other click after it is finished rendering the scene. If it takes the browser longer to render the scene than the double-click threshold and the browser time stamps the click events based on when it gets around to processing them, then the double-click events will be lost and the user will be very frustrated. Happily, modern operating and windowing systems are multithreaded and give the raw device events reasonably accurate time stamps that can be retrieved and used by VRML browsers |
It is possible to create dependencies between various types of sensors. For example, a TouchSensor may result in a change to a VisibilitySensor node's transformation, which in turn may cause the VisibilitySensor node's visibility status to change.
The following two sections classify sensors into two categories: environmental sensors and pointing-device sensors.
| TIP: If you create a paradoxical or indeterministic situation, your world may behave differently on different VRML browsers. Achieving identical (or at least almost-identical) results on different implementations is the primary reason for defining a VRML specification, so a lot of thought was put into designs that removed any possibilities of indeterministic results. For example, two sensors that generated events at exactly the same time could be given a well-defined order, perhaps based on which was created first or their position in the scene graph. Requiring implementations to do this was judged to be unreasonable, because different implementations will have different strategies for delaying the loading of different parts of the world (affecting the order in which nodes are created) and because the scene graph ordering can change over time. The overhead required to make all possible worlds completely deterministic isn't worth the runtime costs. Indeterministic situations are easy to avoid, can be detected and reported at run-time (so the world creator knows that they have a problem), and are never useful. |
2.6.7.2 Environmental sensorsThe ProximitySensor detects when the user navigates into a specified region in the world. The ProximitySensor itself is not visible. The TimeSensor is a clock that has no geometry or location associated with it; it is used to start and stop time-based nodes such as interpolators. The VisibilitySensor detects when a specific part of the world becomes visible to the user. The Collision grouping node detects when the user collides with objects in the virtual world. Pointing-device sensors detect user pointing events such as the user clicking on a piece of geometry (i.e., TouchSensor). Proximity, time, collision, and visibility sensors are each processed independently of whether others exist or overlap.
2.6.7.3 Pointing-device sensors
The following node types are pointing-device sensors:
A pointing-device sensor is activated when the user locates the pointing device over geometry that is influenced by that specific pointing-device sensor. Pointing-device sensors have influence over all geometry that is descended from the sensor's parent groups. In the case of the Anchor node, the Anchor node itself is considered to be the parent group. Typically, the pointing-device sensor is a sibling to the geometry that it influences. In other cases, the sensor is a sibling to groups which contain geometry (i.e., are influenced by the pointing-device sensor).
The appearance properties of the geometry do not affect activation of the sensor. In particular, transparent materials or textures shall be treated as opaque with respect to activation of pointing-device sensors.
| TECHNICAL
NOTE: It is a little bit strange that pointing device sensors
sense hits on all of their sibling geometry. Geometry that occurs
before the pointing device sensor in the children list is treated
exactly the same as geometry that appears after the sensor in the
children list. This is a consequence of the semantics of grouping
nodes. The order of children in a grouping node is irrelevant, so
the position of a pointing device sensor in the children list does
not matter.
Adding a sensor MFNode field to the grouping nodes as a place for sensors (instead of just putting them in the children field) was considered, but rejected because it added complexity to the grouping nodes, was less extensible, and produced little benefit. |
For a given user activation, the lowest, enabled pointing-device sensor in the hierarchy is activated. All other pointing-device sensors above the lowest, enabled pointing-device sensor are ignored. The hierarchy is defined by the geometry node over which the pointing-device sensor is located and the entire hierarchy upward. If there are multiple pointing-device sensors tied for lowest, each of these is activated simultaneously and independently, possibly resulting in multiple sensors activating and generating output simultaneously. This feature allows combinations of pointing-device sensors (e.g., TouchSensor and PlaneSensor). If a pointing-device sensor appears in the transformation hierarchy multiple times (DEF/USE), it must be tested for activation in all of the coordinate systems in which it appears.
If a pointing-device sensor is not enabled when the pointing-device button is activated, it will not generate events related to the pointing device until after the pointing device is deactivated and the sensor is enabled (i.e., enabling a sensor in the middle of dragging does not result in the sensor activating immediately). Note that some pointing devices may be constantly activated and thus do not require a user to activate.
| TECHNICAL
NOTE: There's an intentional inconsistency between the behavior
of the pointing device sensors and the proximity, visibility, and
time sensors. The pointing device sensors follow a "lowest-ones-activate"
policy, but the others follow an "all-activate" policy.
These different policies were chosen based on expected usage.
A TouchSensor, for example, is expected to be used for things like push-buttons in the virtual world. Hierarchical TouchSensors might be used for something like a TV set that had both buttons inside it to turn it on and off, change the channel, and so forth, but also had a TouchSensor on the entire TV that activated a hyperlink (perhaps bringing up the Web page for the product being advertised on the virtual TV). In this case, it would be inconvenient if the hyperlink was also activated when the channel-changing buttons were pressed. On the other hand, for most expected uses of proximity and visibility sensors it is more convenient if they act completely independently of each other. In either case, the opposite behavior is always achievable by either rearranging the scene graph or enabling and disabling sensors at the right times. More complicated policies for the pointing device sensors were considered, giving the world creator control over whether or not events were processed and/or propagated upward at each sensor. However, the simpler policy was chosen because it had worked well in the Open Inventor toolkit and because any desired effect can be achieved by rearranging the position of sensors in the scene graph and/or using a script to enable and disable sensors. |
The Anchor node is considered to be a pointing-device sensor when trying to determine which sensor (or Anchor node) to activate. For example, in the following file a click on Shape3 is handled by SensorD, a click on Shape2 is handled by SensorC and the AnchorA, and a click on Shape1 is handled by SensorA and SensorB:
    Group {
      children [
        DEF Shape1  Shape       { ... }
        DEF SensorA TouchSensor { ... }
        DEF SensorB PlaneSensor { ... }
        DEF AnchorA Anchor {
          url "..."
          children [
            DEF Shape2  Shape { ... }
            DEF SensorC TouchSensor { ... }
            Group {
              children [
                DEF Shape3  Shape { ... }
                DEF SensorD TouchSensor { ... }
              ]
            }
          ]
        }
      ]
    }
2.6.7.4 Drag sensors
Drag sensors are a subset of pointing-device sensors. There are three types of drag sensors: CylinderSensor, PlaneSensor, and SphereSensor. Drag sensors have two eventOuts in comon, trackPoint_changed and <value>_changed. These eventOuts send events for each movement of the activated pointing device according to their "virtual geometry" (e.g., cylinder for CylinderSensor). The trackPoint_changed eventOut sends the unclamped intersection point of the bearing with the drag sensor's virtual geometry. The <value>_changed eventOut sends the sum of the relative change since activation plus the sensor's offset field. The type and name of <value>_changed depends on the drag sensor type: rotation_changed for CylinderSensor, translation_changed for PlaneSensor, and rotation_changed for SphereSensor.
| TECHNICAL NOTE: The TouchSensor and the drag sensors map a 2D pointing device in the 3D world, and are the basis for direct manipulation of the objects in the virtual world. TouchSensor samples the motion of the pointing device over the surface of an object, PlaneSensor projects the motion of the pointing device onto a 3D plane, and SphereSensor and -CylinderSensor generate 3D rotations from the motion of the pointing device. Their functionality is limited to performing the mapping from 2D into 3D; they must be combined with geometry, transformations, or script logic to be useful. Breaking apart different pieces of functionality into separate nodes does make it more difficult to perform common tasks, but it creates a design that is much more flexible. Features may be combined in endless variations, resulting in a specification with a whole that is greater than the sum of its parts (and, of course, the prototyping mechanism can be used to make the common variations easy to reuse). |
To simplify the application of these sensors, each node has an offset and an autoOffset exposed field. When the sensor generates events as a response to the activated pointing device motion, <value>_changed sends the sum of the relative change since the initial activation plus the offset field value. If autoOffset is TRUE when the pointing-device is deactivated, the offset field is set to the sensor's last <value>_changed value and offset sends an offset_changed eventOut. This enables subsequent grabbing operations to accumulate the changes. If autoOffset is FALSE, the sensor does not set the offset field value at deactivation (or any other time).
| TECHNICAL NOTE: The original Moving Worlds drag sensors did not have offset or autoOffset fields. This resulted in drag sensors that reset themselves back to zero at the beginning of each use and made it extremely difficult to create the typical case of an accumulating sensor. By adding the offset field, it enables drag sensors to accumulate their results (e.g., translation, rotation) by saving their last <value>_changed in the offset field. |
2.6.7.5 Activating and manipulating sensors
The pointing device controls a pointer in the virtual world. While activated by the pointing device, a sensor will generate events as the pointer moves. Typically the pointing device may be categorized as either 2D (e.g., conventional mouse) or 3D (e.g., wand). It is suggested that the pointer controlled by a 2D device is mapped onto a plane a fixed distance from the viewer and perpendicular to the line of sight. The mapping of a 3D device may describe a 1:1 relationship between movement of the pointing device and movement of the pointer.
The position of the pointer defines a bearing which is used to determine which geometry is being indicated. When implementing a 2D pointing device it is suggested that the bearing is defined by the vector from the viewer position through the location of the pointer. When implementing a 3D pointing device it is suggested that the bearing is defined by extending a vector from the current position of the pointer in the direction indicated by the pointer.
In all cases the pointer is considered to be indicating a specific geometry when that geometry is intersected by the bearing. If the bearing intersects multiple sensors' geometries, only the sensor nearest to the pointer will be eligible for activation.
2.6.8 Interpolators
Interpolator nodes are designed for linear keyframed animation. An interpolator node defines a piecewise-linear function, f(t), on the interval (-infinity, +infinity). The piecewise-linear function is defined by n values of t, called key, and the n corresponding values of f(t), called keyValue. The keys shall be monotonic nondecreasing and are not restricted to any interval. Results are undefined if the keys are nonmonotonic or nondecreasing.
| TIP:
In other words, interpolators are used to perform keyframe animations.
You specify a list of keyframe values and times, and the VRML browser
will automatically interpolate the "in-betweens." VRML allows
only linear interpolation; it does not support spline curve interpolation,
which can be found in most commerical animation systems. This limitation
was made in order to keep VRML implementations small, fast, and simple.
Note that it is possible for authoring systems to use sophisticated
spline curves during authoring, but publish the resulting VRML file
using the linear interpolators (thus getting the best of both worlds).
You may find that it is necessary to specify a lot of keyframes to
produce smooth or complex animations.
Note that there are several different types of interpolators; each one animates a different field type. For example, the PositionInterpolator is used to animate an object's position (i.e., Transform node's translation field) along a motion path (defined by keyValue). To produce typical animated object motion, you can employ both a Position-Interpolator and an OrientationInterpolator. The PositionInterpolator moves the object along a motion path, while the OrientationInterpolator rotates the object as it moves. |
| TIP: Remember that TimeSensor outputs fraction_changed events in the 0.0 to 1.0 range, and that interpolator nodes routed from TimeSensors should restrict their key field values to the 0.0 to 1.0 range to match the TimeSensor output and thus produce a full interpolation sequence. |
An interpolator node evaluates f(t) given any value of t (via the set_fraction eventIn) as follows: Let the n keys k0, k1, k2, ..., kn-1 partition the domain (-infinity, +infinity) into the n+1 subintervals given by (-infinity, k0), [k0, k1), [k1, k2), ... , [kn-1, +infinity). Also, let the n values v0, v1, v2, ..., vn-1 be the values of an unknown function, F(t), at the associated key values. That is, vj = F(kj). The piecewise-linear interpolating function, f(t), is defined to be
     f(t) = v0, if t < k0,
          = vn-1, if t > kn-1,
          = vi, if t = ki for some value
            of i, where -1 < i < n,
          = linterp(t, vj, vj+1), if kj < t < kj+1

     where linterp(t,x,y) is the linear interpolant,
     and -1 < j < n-1.
The third conditional value of f(t) allows the defining of multiple values for a single key, (i.e., limits from both the left and right at a discontinuity in f(t)). The first specified value is used as the limit of f(t) from the left, and the last specified value is used as the limit of f(t) from the right. The value of f(t) at a multiply defined key is indeterminate, but should be one of the associated limit values.
The following node types are interpolator nodes, each based on the type of value that is interpolated:
- ColorInterpolator
- CoordinateInterpolator
- NormalInterpolator
- OrientationInterpolator
- PositionInterpolator
- ScalarInterpolator
All interpolator nodes share a common set of fields and semantics:
    eventIn      SFFloat      set_fraction
    exposedField MFFloat      key           [...]
    exposedField MF<type>     keyValue      [...]
    eventOut     [S|M]F<type> value_changed
The type of the keyValue field is dependent on the type of the interpolator (e.g., the ColorInterpolator's keyValue field is of type MFColor).
| TECHNICAL NOTE: Creating new field types that are more convenient for animation keyframes was considered. This led to thinking about a syntax to create arbitrary new field types. For example, the keyframes for a PositionInterpolator could be defined as M[SFFloat,SFVec3f] (any number of pairs consisting of a float and a vec3f). An SFVec3f might be defined as [SFFloat, SFFloat, SFFloat]. However, creating an entire data type description language to solve what is only a minor annoyance would have had major ramifications on the rest of VRML and was judged to be gratuitous engineering. |
The set_fraction eventIn receives an SFFloat event and causes the interpolator function to evaluate, resulting in a value_changed eventOut with the same timestamp as the set_fraction event.
| TECHNICAL NOTE:
Restricting interpolators to do linear interpolation was controversial,
because using curves to do motion interpolation is common. However,
there was no single, obvious choice for a curve representation and
it seemed unlikely that a technical discussion would be able to resolve
the inevitable debate over which curve representation is best. Because
simple linear interpolation would be needed even if nonlinear interpolation
was part of the specification, and because any nonlinear interpolation
can be linearly approximated with arbitrary precision, only linear
interpolators made it into the VRML 2.0 specification.
If you are faced with the task of translating an animation curve into VRML's linear interpolators, you have three choices. You can choose a temporal resolution and tessellate the curve into a linear approximation, balancing the quality of the approximation against the size of the resulting file. Better yet, give the user control over the quality versus size trade-off. Or you can write a script that performs this tessellation when the VRML file is read, put it into an appropriate prototype (which will contain an empty interpolator and the script, with an initialize() method that fills in the fields of the interpolator based on the curve's parameters), and write out the curve representation directly into the VRML file (as fields of prototype instances). Bandwidth requirements will be much smaller since the PROTO definition only needs to be sent once and the untessellated curve parameters will be much smaller than the linear approximation. Animations implemented this way may still require significant memory resources, however, since the tessellation is performed at start-up and stored in memory. You can also write a script that directly implements the mathematics of the curve interpolation, and put that into a prototype. In fact, all of the linear interpolators defined as part of the VRML standard can be implemented as prototyped Script nodes. The reason they are part of the standard is to allow implementations to create highly optimized interpolators, since they are very common. Therefore, if you want your animations to be executed as quickly as possible, you should tessellate the animation curve (preferably after it has been downloaded, as described in the previous paragraph) and put the result in an interpolator. However, if you want to minimize memory use or maximize the quality of the animation, you should write a script that takes in set_fraction events and computes appropriate value_changed events directly. |
Four of the six interpolators output a single-value field to value_changed. Each value in the keyValue field corresponds in order to the parameter value in the key field. Results are undefined if the number of values in the key field of an interpolator is not the same as the number of values in the keyValue field.
CoordinateInterpolator and NormalInterpolator send multiple-value results to value_changed. In this case, the keyValue field is an n x m array of values, where n is the number of values in the key field and m is the number of values at each keyframe. Each m values in the keyValue field correspond, in order, to a parameter value in the key field. Each value_changed event shall contain m interpolated values. Results are undefined if the number of values in the keyValue field divided by the number of values in the key field is not a positive integer.
If an interpolator node's value eventOut is read (e.g., get_value( )) before it receives any inputs, keyValue[0] is returned if keyValue is not empty. If keyValue is empty (i.e., [ ]), the initial value for the eventOut type is returned (e.g., (0, 0, 0) for SFVec3f); see "Chapter 4, Fields and Events Reference" for event default values.
The location of an interpolator node in the transformation hierarchy has no effect on its operation. For example, if a parent of an interpolator node is a Switch node with whichChoice set to -1 (i.e., ignore its children), the interpolator continues to operate as specified (receives and sends events).
| TIP: The spatial hierarchy of grouping nodes in the scene graph has nothing to do with the logical hierarchy formed by ROUTE statements. Interpolator (and Script) nodes have no particular location in the virtual world, so their position in the spatial hierarchy is irrelevant. You can make them the child of whichever grouping node is convenient or put them all at the end of your VRML file just before all the ROUTE statements. |
2.6.9 Time-dependent nodes
AudioClip, MovieTexture, and TimeSensor are time-dependent nodes that activate and deactivate themselves at specified times. Each of these nodes contains the exposedFields: startTime, stopTime, and loop, and the eventOut: isActive. The exposedField values are used to determine when the container node becomes active or inactive. Also, under certain conditions, these nodes ignore events to some of their exposedFields. A node ignores an eventIn by not accepting the new value and not generating an eventOut_changed event. In this section, an abstract time-dependent node can be any one of AudioClip, MovieTexture, or TimeSensor.
| TECHNICAL NOTE: AudioClip and MovieTexture could have been designed to be driven by a TimeSensor (like the interpolator nodes) instead of having the startTime, and so forth, controls. However, that would have caused several implementation difficulties. Playback of sound and movies is optimized for continuous, in-order play; multimedia systems often have specialized hardware to deal with sound and (for example) MPEG movies. Efficiently implementing the AudioClip and MovieTexture nodes is much harder if those nodes do not know the playback speed, whether or not the sound/movie should be repeated, and so on. In addition, sounds and movies may require "preroll" time to prepare to playback; this is possible only if the AudioClip or MovieTexture know their start time. In this case, separating out the time-generation functionality, although it would make a more flexible system (playing movies backward by inverting the fraction_changed events coming from the TimeSensor going to a MovieTexture would be possible, for example), it would make it unacceptably hard to implement efficiently (it is difficult to play an MPEG movie backward efficiently because of the frame-to-frame compression that is done, for example). |
Time-dependent nodes can execute for 0 or more cycles. A cycle is defined by field data within the node. If, at the end of a cycle, the value of loop is FALSE, execution is terminated (see below for events at termination). Conversely, if loop is TRUE at the end of a cycle, a time-dependent node continues execution into the next cycle. A time-dependent node with loop TRUE at the end of every cycle continues cycling forever if startTime >= stopTime, or until stopTime if stopTime > startTime.
| TECHNICAL NOTE:
Unless you set the stopTime field, a time-dependent node either cycles
once (if loop is FALSE) or plays over and over again (if loop is TRUE).
For MovieTexture, one cycle corresponds to displaying the movie once;
for AudioClip, playing the sound once; for TimeSensor, generating
fraction_changed events that go from 0.0 to 1.0 once.
The startTime, stopTime, and loop fields are generally all you need to accomplish simple tasks. StartTime is simply the time at which the animation or sound or movie should start. StopTime was named interruptTime in a draft version of the VRML specification; it allows you to stop the animation/sound/movie while it is playing. And loop just controls whether or not the animation/sound/movie is repeated. |
A time-dependent node generates an isActive TRUE event when it becomes active and generates an isActive FALSE event when it becomes inactive. These are the only times at which an isActive event is generated. In particular, isActive events are not sent at each tick of a simulation.
A time-dependent node is inactive until its startTime is reached. When time now becomes greater than or equal to startTime, an isActive TRUE event is generated and the time-dependent node becomes active (now refers to the time at which the browser is simulating and displaying the virtual world). When a time-dependent node is read from a file and the ROUTEs specified within the file have been established, the node should determine if it is active and, if so, generate an isActive TRUE event and begin generating any other necessary events. However, if a node would have become inactive at any time before the reading of the file, no events are generated upon the completion of the read.
An active time-dependent node will become inactive when stopTime is reached if stopTime > startTime. The value of stopTime is ignored if stopTime <= startTime. Also, an active time-dependent node will become inactive at the end of the current cycle if loop is FALSE. If an active time-dependent node receives a set_loop FALSE event, execution continues until the end of the current cycle or until stopTime (if stopTime > startTime), whichever occurs first. The termination at the end of cycle can be overridden by a subsequent set_loop TRUE event.
Any set_startTime events to an active time-dependent node are ignored. Any set_stopTime events where stopTime <= startTime, to an active time-dependent node are also ignored. A set_stopTime event where startTime < stopTime <= now sent to an active time-dependent node results in events being generated as if stopTime has just been reached. That is, final events, including an isActive FALSE, are generated and the node becomes inactive. The stopTime_changed event will have the set_stopTime value. Other final events are node-dependent (c. f., TimeSensor).
| TECHNICAL NOTE:
To get precise, reproducible behavior, there are a lot of edge conditions
that must be handled the same way in all implementations. Creating
a concise, precise specification that defined the edge cases was one
of the most difficult of the VRML 2.0 design tasks.
One problem was determining how to handle set_stopTime events with values that are in the past. In theory, if the world creator sends a TimeSensor a set_stopTime "yesterday" event, they are asking to see the state of the world as if the time sensor had stopped yesterday. And, theoretically, a browser could resimulate the world from yesterday until today, replaying any events and taking into account the stopped time sensor. However, requiring browsers to interpret events that occurred in the past is unreasonable; so, instead, set_stopTime events in the past are either ignored (if stopTime < startTime) or are reinterpreted to mean "now." |
A time-dependent node may be restarted while it is active by sending a set_stopTime event equal to the current time (which will cause the node to become inactive) and a set_startTime event, setting it to the current time or any time in the future. These events will have the same time stamp and should be processed as set_stopTime, then set_startTime to produce the correct behaviour.
| TIP: To pause and then restart an animation, do the following in a script: Set the stopTime to now to pause the animation. To restart, you must adjust both the startTime and the stopTime of the animation. Advance the startTime by the amount of time that the animation has been paused so that it will continue where it left off. This is easily calculated as startTime = startTime + now - stopTime (where now is the time stamp of the event that causes the animation to be restarted). Set the stopTime to zero or any other value less than or equal to startTime, so that it is ignored and the animation restarts. |
| TECHNICAL NOTE:
There are implicit dependencies between the fields of time-dependent
nodes. If a time-dependent node receives several events with exactly
the same time stamp, these dependencies force the events to be processed
in a particular order. For example, if, at time T, a TimeSensor node
receives both a set_active FALSE and a set_startTime event (both with
time stamp T), the node must behave as if the set_active event is
processed first and must not start playing. Similarly, set_stopTime
events must be processed before set_startTime events with the same
time stamp.
Set_startTime events are ignored if a time-dependent node is active, because doing so makes writing robust animations much easier. For example, if you have a button (a touch sensor and some geometry) that starts an animation, you usually want the animation to finish playing, even if the user presses the button again while the animation is playing. You can easily get the other behavior by setting both stopTime and startTime when the button is pressed. If set_startTime events were not ignored when the node was active, then achieving "play-to-completion" behavior would require use of a Script to manage set_startTime events. |
The default values for each of the time-dependent nodes are specified such that any node with default values is already inactive (and, therefore, will generate no events upon loading). A time-dependent node can be defined such that it will be active upon reading by specifying loop TRUE. This use of a non-terminating time-dependent node should be used with caution since it incurs continuous overhead on the simulation.
| TECHNICAL NOTE: If you want your worlds to be scalable, everything in them should have a well-defined scope in space or time. Spatial scoping means specifying bounding boxes that represent the maximum range of an object's motion whenever possible, and arranging objects in spatial hierarchies. Temporal scoping means giving any animations well-defined starting and ending times. If you create an animation that is infinitely long--a windmill turning in the breeze, perhaps--you should try to specify its spatial scope, so that the browser can avoid performing the animation if that part of space cannot be seen. |
2.6.10 Bindable children nodes
The Background, Fog, NavigationInfo, and Viewpoint nodes have the unique behaviour that only one of each type can be bound (i.e., affecting the user's experience) at any instant in time. The browser shall maintain an independent, separate stack for each type of binding node. Each of these nodes includes a set_bind eventIn and an isBound eventOut. The set_bind eventIn is used to move a given node to and from its respective top of stack. A TRUE value sent to the set_bind eventIn moves the node to the top of the stack; sending a FALSE value removes it from the stack. The isBound event is output when a given node is:
- moved to the top of the stack
- removed from the top of the stack
- pushed down from the top of the stack by another node being placed on top
That is, isBound events are sent when a given node becomes or ceases to be the active node. The node at the top of stack, (the most recently bound node), is the active node for its type and is used by the browser to set the world state. If the stack is empty (i.e., either the file has no binding nodes for a given type or the stack has been popped until empty), the default field values for that node type are used to set world state. The results are undefined if a multiply instanced (DEF/USE) bindable node is bound.
|
TIP: In general, you should avoid creating multiple instances of bindable nodes (i.e., don't USE bindable nodes). Results are undefined for multi-instanced bindable nodes because the effects of binding a Background, Fog, or Viewpoint node depend on the coordinate space in which it is located. If it is multi-instanced, then it (probably) exists in multiple coordinate systems. For example, consider a Viewpoint node that is multi-instanced. The first instance (DEF VIEW) specifies it at the origin and the second instance (USE VIEW) translates it to (10,10,10): # Create 1st instance
DEF VIEW Viewpoint { position 0 0 0 }
Transform {
translation 10 10 10
children USE VIEW # creates 2nd instance
}
Binding to VIEW is ambiguous since it implies that the user should view the world from two places at once (0 0 0) and (10 10 10). Therefore the results are undefined and browsers are free to do nothing, pick the first instance, pick the closest instance, or even split the window in half and show the user both views. In any case, avoid USE-ing bindable nodes. Since USE-ing any of a bindable node's parents will also result in the bindable node being in two places at once, you should avoid doing that also. For example:
        Group { children [
          Transform {
            translation -5 -5 -5
            children DEF G Group {
              children [
                DEF VIEW Viewpoint { }
                Shape { geometry ... etc... }
              ]
            }
          }
          Transform { translation 3 4 0
            children USE G   # Bad, VIEW is now
          }                  # multiply instanced
        ]}
This results in the VIEW Viewpoint being at two places at once ((-5,-5,-5) and (3,4,0)). If you send a set_bind event to VIEW, results are undefined. Nothing above a bindable node should be USE'd. So, what if you do want to create a reusable piece of the scene with viewpoints inside it? Instead of using USE, you should use the PROTO mechanism, because a PROTO -creates a copy of everything inside it:
        PROTO G [ eventIn SFBool bind_to_viewpoint ]
        {
          Group { children [
            DEF VIEW Viewpoint {
              set_bind IS bind_to_viewpoint
            }
            Shape { geometry ... etc ... }
          ]}
        }
        Group { children [
          Transform {
            translation -5 -5 -5
            children DEF G1 G { }
          }
          Transform { translation 3 4 0
            children DEF G2 G { }  # No problem,
          }                        # create a 2nd VP.
        ]}
You can use either Viewpoint by sending either G1 or G2 a bind_to_viewpoint event. Smart browser implementations will notice that the geometry for both G1 and G2 is exactly the same and can never change, allowing them to share the same geometry between both G1 and G2, and making the PROTO version extremely efficient. |
The following rules describe the behaviour of the binding stack for a node of type <binding node>, (Background, Fog, NavigationInfo, or Viewpoint):
- During read, the first encountered <binding node> is bound by pushing it to the top of the <binding node> stack. Nodes contained within Inlines, within the strings passed to the Browser.createVrmlFromString() method, or within files passed to the Browser.createVrmlFromURL() method (see "2.12.10 Browser script interface")are not candidates for the first encountered <binding node>. The first node within a prototype instance is a valid candidate for the first encountered <binding node>. The first encountered <binding node> sends an isBound TRUE event.
- When a set_bind TRUE event is received by a <binding node>,
- if it is not on the top of the stack: the current top of stack node sends an isBound FALSE event. The new node is moved to the top of the stack and becomes the currently bound <binding node>. The new <binding node> (top of stack) sends an isBound TRUE event.
- If the node is already at the top of the stack, this event has no effect.
- When a set_bind FALSE event is received by a <binding node> in the stack, it is removed from the stack. If it was on the top of the stack,
- it sends an isBound FALSE event,
- the next node in the stack becomes the currently bound <binding node> (i.e., pop) and issues an isBound TRUE event.
- If a set_bind FALSE event is received by a node not in the stack, the event is ignored and isBound events are not sent.
- When a node replaces another node at the top of the stack, the isBound TRUE and FALSE eventOuts from the two nodes are sent simultaneously (i.e., with identical timestamps).
- If a bound node is deleted, it behaves as if it received a set_bind FALSE event (see c above).
| TIP:
The binding stack semantics were designed to make it easy to create
composable worlds--worlds that can be included in larger metaworlds.
As an example, imagine that you've created a model of a planet,
complete with buildings, scenery, and a transportation system that
uses TouchSensors and animated Viewpoints so that it is easy to
get from place to place. Someone else might like to use your planet
as part of a solar system he is building, animating the position
and orientation of the planet to make it spin around the sun. To
make it easy to go from a tour of the solar system to your planetary
tour, they can place an entry viewpoint on the surface of your planet.
The binding stack becomes useful when the viewer travels to (binds to) the entry viewpoint and then travels around the planet binding and unbinding from your viewpoints. If there was no binding stack, then when the viewer was unbound from one of the planet's viewpoints they would no longer move with the planet around the sun, and would suddenly find themselves watching the planet travel off into space. Instead, the entry viewpoint will remain in the binding stack, keeping the user in the planet's coordinate system until he decides to continue the interplanetary tour. The binding stacks keep track of where the user is in the scene graph hierarchy, making it easy to create worlds within worlds. If you have several bindable nodes that are at the same level in the scene hierarchy, you will probably want to manage them as a group, unbinding the previous node (if any) when another is bound. In the solar system example, the solar system creator might put a teleport station on the surface of each world, with a list of planetary destinations. The teleport station would consist of the entry viewpoint and a signpost that would trigger a script to unbind the user from this planet's viewpoint and bind him to the new planet's entry viewpoint (and, perhaps, start up teleportation animations or sounds). All of the entry viewpoints are siblings in the scene graph hierarchy and each should be unbound before binding to the next. If you want your worlds to be usable as part of a larger metaworld, you should make sure each bindable node has a well-defined scope (in either space or time) during which it will be bound. For example, although you could create a TimeSensor that constantly sent set_bind TRUE events to a bindable node, doing so will result in a world that won't work well with other worlds. |
2.6.11 Texture maps
2.6.11.1 Texture map formats
Four nodes specify texture maps: Background, ImageTexture, MovieTexture, and PixelTexture. In all cases, texture maps are defined by 2D images that contain an array of colour values describing the texture. The texture map values are interpreted differently depending on the number of components in the texture map and the specifics of the image format. In general, texture maps may be described using one of the following forms:
- Intensity textures (one-component)
- Intensity plus alpha opacity textures (two-component)
- Full RGB textures (three-component)
- Full RGB plus alpha opacity textures (four-component)
Note that most image formats specify an alpha opacity, not transparency (where alpha = 1 - transparency).
See Table 2-5 and Table 2-6 for a description of how the various texture types are applied.
2.6.11.2 Texture map image formats
Texture nodes that require support for the PNG (see [PNG]) image format ("3.5 Background" and "3.22 ImageTexture") shall interpret the PNG pixel formats in the following way:
- greyscale pixels without alpha or simple transparency are treated as intensity textures
- greyscale pixels with alpha or simple transparency are treated as intensity plus alpha textures
- RGB pixels without alpha channel or simple transparency are treated as full RGB textures
- RGB pixels with alpha channel or simple transparency are treated as full RGB plus alpha textures
If the image specifies colours as indexed-colour (i.e., palettes or colourmaps), the following semantics should be used (note that `greyscale' refers to a palette entry with equal red, green, and blue values)
- if all the colours in the palette are greyscale and there is no transparency chunk, it is treated as an intensity texture
- if all the colours in the palette are greyscale and there is a transparency chunk, it is treated as an intensity plus opacity texture
- if any colour in the palette is not grey and there is no transparency chunk, it is treated as a full RGB texture
- if any colour in the palette is not grey and there is a transparency chunk, it is treated as a full RGB plus alpha texture
Texture nodes that require support for JPEG files (see [JPEG], "3.5 Background", and "3.22 ImageTexture") shall interpret JPEG files as follows:
- greyscale files (number of components equals 1) treated as intensity textures
- YCbCr files treated as full RGB textures
- no other JPEG file types are required. It is recommended that other JPEG files be treated as full RGB textures.
Texture nodes that support MPEG files (see [MPEG] and "3.28 MovieTexture") shall treat MPEG files as full RGB textures.
Texture nodes that recommend support for GIF files (see [GIF], "3.5 Background", and "3.22 ImageTexture") shall follow the applicable semantics described above for the PNG format.