|
Chapter 3:
Node Reference
Intro
Anchor
Appearance
AudioClip
Background
Billboard
Box
Collision
Color
ColorInterpolator
Cone
Coordinate
CoordinateInterpolator
Cylinder
CylinderSensor
DirectionalLight
ElevationGrid
Extrusion
Fog
FontStyle
Group
ImageTexture
IndexedFaceSet
IndexedLineSet
Inline
LOD
Material
MovieTexture
NavigationInfo
Normal
NormalInterpolator
OrientationInterpolator
PixelTexture
PlaneSensor
PointLight
PointSet
PositionInterpolator
ProximitySensor
ScalarInterpolator
Script
Shape
Sound
Sphere
SphereSensor
SpotLight
Switch
Text
TextureCoordinate
TextureTransform
TimeSensor
TouchSensor
Transform
Viewpoint
VisibilitySensor
WorldInfo
|
Fog {
exposedField SFColor color 1 1 1 # [0,1]
exposedField SFString fogType "LINEAR"
exposedField SFFloat visibilityRange 0 # [0, )
eventIn SFBool set_bind
eventOut SFBool isBound
} )
eventIn SFBool set_bind
eventOut SFBool isBound
}
The Fog node provides a way to simulate atmospheric effects by blending
objects with the colour specified by the color field based on
the distances of the various objects from the viewer. The distances
are calculated in the coordinate space of the Fog node. The visibilityRange
specifies the distance (in the local coordinate system) at which objects
are totally obscured by the fog. Objects located visibilityRange
meters or more away from the viewer are drawn with a constant colour
of color. Objects very close to the viewer are blended very little
with the fog color. A visibilityRange of 0.0 disables
the Fog node. The visibilityRange is affected by the scaling
transformations of the Fog node's parents; translations and rotations
have no affect on visibilityRange. values of the visibilityRange
field shall be in the range [0, ).
| TIP:
Controlling
the fog color allows many interesting effects. A foggy day calls
for a fog color of light gray; a foggy night calls for a dark gray
fog color. You can get a depth-cuing effect in which objects get
darker the farther they are from the viewer by using a black fog
color, and can get smoke and/or fire by making the fog blue or red.
Use visibilityRange to control the density of the fog, smoke,
or haze. |
Since Fog nodes are bindable children nodes (see "2.6.10 Bindable children nodes"), a Fog node
stack exists, in which the top-most Fog node on the stack is currently
active. To push a Fog node onto the top of the stack, a TRUE value is
sent to the set_bind eventIn. Once active, the Fog node is bound
to the browser view. A FALSE value sent to set_bind, pops the
Fog node from the stack and unbinds it from the browser viewer. More
details on the Fog node stack may be found in "2.6.10 Bindable children nodes."
| TIP:
You
can use the Fog stack to create effects like the inside of a house
that is free of fog located in a very foggy town. When the user
enters the house, a ProximitySensor can be used to bind a Fog node
that turns off Fog. When the user leaves the house, the Fog node
is unbound and the user sees the foggy street. The transition from
outdoors to indoors might also involve binding a Background node
with prerendered foggy street scenes that will be seen out of the
windows of the house and binding a NavigationInfo node to let the
VRML browser know that the user can't see very far when they are
inside the house. |
The fogType field controls how much of the fog colour is blended
with the object as a function of distance. If fogType is "LINEAR"
(the default), the amount of blending is a linear function of the distance,
resulting in a depth cuing effect. If fogType is "EXPONENTIAL,"
an exponential increase in blending is used, resulting in a more natural
fog appearance.
The impact of fog support on lighting calculations is described in
"2.14 Lighting model."
| TIP:
If
the Background color or image doesn't match the fog color, then
you will see fog-colored silhouettes of faraway objects against
the background. There are cases when it is useful to have only part
of the background match the fog color, which is why the background
is not forced to match the fog color when fogging is being done.
For example, to simulate ground fog at night you might have a background
that is fog colored close to the horizon, but has an image of slightly
foggy stars straight overhead. As long as there were no objects
floating in the sky overhead (which would appear foggy and spoil
the effect), as viewers looked out over the city they would see
the buildings fading into the fog while still seeing stars overhead. |
| TECHNICAL
NOTE: Fog
can be very useful as a technique to limit how much of the world
the user can see at any one time, giving better rendering performance.
It can also give users valuable depth cues that enhance the feeling
of being in a 3D space. However, fog is a fairly advanced rendering
feature that implementations may be forced to approximate by performing
fogging calculations only once per vertex or even once per Shape
node instead of the ideal, which is to fog each pixel rendered.
|
|
TIP: Use
the Fog node in combination with LOD to reduce the visual complexity
of the scene and thus increase rendering performance. Tune visibilityRange
to match the maximum range in the LOD nodes and set the
last child of the LOD to a WorldInfo node. This has the effect
of not rendering any objects outside the Fog range! Since the
Fog creates a natural fade to the visibilityRange, users
will not notice objects popping in and out as the LOD goes to
maximum range. This can be a very effective technique for producing
interactive frame rates. Experiment and tune the ranges for each
particular scene. Also note that the visibilityLimit field
of the NavigationInfo node can produce a similar result and should
be considered as well (verify that the browser supports the visibilityLimit
feature).
Also, use
ProximitySensors to bind and unbind Fog nodes as the user enters
and exits regions of the world with differing Fog values. In regions
where there is no fog, set visibilityRange to 0 to disable
Fog.
As stated,
Fog nodes are typically used in conjunction with a Background
node by setting the Background's skyColor equal or similar
to the Fog's color.
|
EXAMPLE
(click to run):
The following example illustrates typical use of the Fog node see
Figure 3-24). Notice how a Background node is created to correspond
to each Fog node. ProximitySensors are used to bind and unbind the
two Fog nodes:
#VRML V2.0 utf8
Group {
  children [
    DEF F1 Fog { color 1 1 1 visibilityRange 10 }        # Room fog
    DEF F2 Fog { color 0.5 0.5 0.5 visibilityRange 85 }  # Out fog
    DEF B1 Background { skyColor 1 1 1 }                 # Room bkg
    DEF B2 Background { skyColor 0.5 0.5 0.5 }           # Out bkg
    Transform {
      translation 0 1.5 0
      children DEF P1 ProximitySensor { size 4 3 4 }
    }
    Transform {
      translation 0 25 -52
      children DEF P2 ProximitySensor { size 100 50 100 }
    }
    Transform { children [           # A room with a cone inside
      Shape {                        # The room
        appearance DEF A Appearance {
          material DEF M Material {
            diffuseColor 1 1 1 ambientIntensity .33
          }
        }
        geometry IndexedFaceSet {
          coord Coordinate {
            point [ 2 0 -2, 2 0 2, -2 0 2, -2 0 -2,
                    2 2 -2, 2 2 2, -2 2 2, -2 2 -2 ]
          }
          coordIndex [ 0 1 5 4 -1, 1 2 6 5 -1, 2 3 7 6 -1, 4 5 6 7 ]
          solid FALSE
        }
      }
      Transform {                    # Cone in the room
        translation -1 0.5 -1.7
        children DEF S Shape {
          geometry Cone { bottomRadius 0.2 height 1.0 }
          appearance USE A
        }
      }
    ]}
    Transform { children [           # Outside the room
      Shape {                        # Textured ground plane
        appearance Appearance {
          material USE M
          texture ImageTexture { url "marble.gif" }
        }
        geometry IndexedFaceSet {
          coord Coordinate {
            point [ 50 0 -100, -50 0 -100, -50 0 2, 50 0 2 ]
          }
          coordIndex [ 0 1 2 3 ]
        }
      }
      Transform {                     # Object outside
        scale 20 20 20
        translation 0 10 -25
        children USE S
      }
    ]}
    Viewpoint { position 1.5 1.0 1.8 orientation 0 0 1 0 }
    DirectionalLight { direction 0 -1 0 }
  ]
}
ROUTE P1.isActive TO F1.set_bind # These routes bind and unbind the
ROUTE P1.isActive TO B1.set_bind #  room fog/bkg & outdoors fog/bkg
ROUTE P2.isActive TO F2.set_bind #  as the avatar enters/exits the
ROUTE P2.isActive TO B2.set_bind #  the ProximitySensors.
|
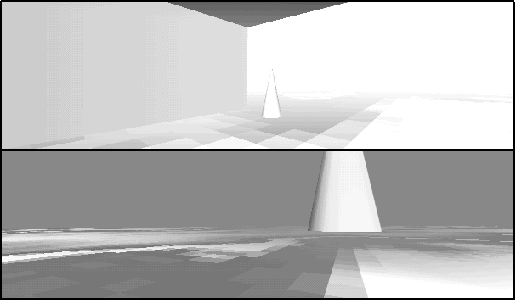
Figure 3-24: Two Frames from the Fog Node Example
|