|
Chapter 3:
Node Reference
Intro
Anchor
Appearance
AudioClip
Background
Billboard
Box
Collision
Color
ColorInterpolator
Cone
Coordinate
CoordinateInterpolator
Cylinder
CylinderSensor
DirectionalLight
ElevationGrid
Extrusion
Fog
FontStyle
Group
ImageTexture
IndexedFaceSet
IndexedLineSet
Inline
LOD
Material
MovieTexture
NavigationInfo
Normal
NormalInterpolator
OrientationInterpolator
PixelTexture
PlaneSensor
PointLight
PointSet
PositionInterpolator
ProximitySensor
ScalarInterpolator
Script
Shape
Sound
Sphere
SphereSensor
SpotLight
Switch
Text
TextureCoordinate
TextureTransform
TimeSensor
TouchSensor
Transform
Viewpoint
VisibilitySensor
WorldInfo
|
ImageTexture {
  exposedField MFString url     []
  field        SFBool   repeatS TRUE
  field        SFBool   repeatT TRUE
}
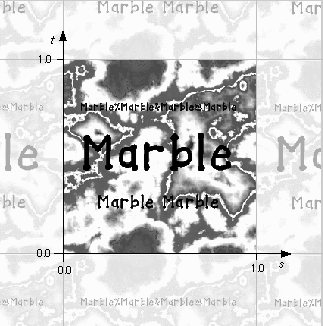
The ImageTexture node defines a texture map by specifying an image
file and general parameters for mapping to geometry. Texture maps are
defined in a 2D coordinate system (s, t) that ranges from [0.0,
1.0] in both directions. The bottom edge of the image corresponds to
the S-axis of the texture map, and left edge of the image corresponds
to the T-axis of the texture map. The lower-left pixel of the image
corresponds to s=0, t=0, and the top-right pixel of the image corresponds
to s=1, t=1. These relationships are depicted in Figure 3-28.
| TIP:
Figure 3-28 illustrates the image space of a texture map image (specified
in the url field). Notice how the image defines the 0.0 to
1.0 s and t boundaries. Regardless of the size and aspect ratio
of the texture map image, the left edge of the image always represents
s = 0, the right edge, s = 1.0, the bottom edge, t = 0.0, and the
top edge, t = 1.0. Also, notice how we have illustrated the texture
map infinitely repeating in all directions. This shows what happens
conceptually when s and t values, specified by the TextureCoordinate
node, are outside of the 0.0 to 1.0 range. |
The texture is read from the URL specified by the url field.
When the url field contains no values ([]), texturing is disabled.
Browsers shall support the JPEG (see 2. [JPEG]) and PNG (see 2. [PNG]) image file formats. In addition, browsers
may support other image formats (e.g. CGM, see 2. [CGM]) which can be rendered into a 2D image.
Support for the GIF format (see E. [GIF])
is also recommended (including transparency). Details on the url
field are described in "2.5 VRML and the World Wide Web."
See "2.6.11 Texture maps" for a general
description of texture maps.
See "2.14 Lighting model" for a description
of lighting equations and the interaction between textures, materials,
and geometry appearance.
The repeatS and repeatT fields specify how the texture
wraps in the S and T directions. If repeatS is TRUE (the default),
the texture map is repeated outside the [0.0, 1.0] texture coordinate
range in the S direction so that it fills the shape. If repeatS
is FALSE, the texture coordinates are clamped in the S direction to
lie within the [0.0, 1.0] range. The repeatT field is analogous
to the repeatS field.
| TIP:
ImageTexture nodes are specified in the texture field of
Appearance nodes. |
|
TECHNICAL
NOTE: GIF is a very popular file
format on the WWW and support for GIF-format textures would
undoubtedly be required by the VRML specification if it was
free of licensing restrictions. Browser implementors typically
support displaying GIF-format textures, since they are so popular,
and decompressing GIF images is allowed by Unisys with no licensing
requirement. However, content-creation tools should migrate
to the PNG image format, which is superior to GIF and is free
of patents. Browsers that support GIF images should also support
the GIF "transparency color" feature, which maps one color in
the image as fully transparent (alpha = 0). Furthermore, if
the color map of the GIF image is composed of only gray hues,
the texture should be interpreted as a one-channel image (if
there's no transparency color) or two-channel image (if there
is a transparency color), and is modulated by Material diffuseColor.
Both
PNG and JPEG (JFIF is actually the proper name for the popular
file format that uses the JPEG compression algorithm, but only
image-file-format techies care about the distinction) are required,
rather than just one or the other, for a few reasons:
1. JPEG
is a lossy compression algorithm, most appropriate for natural
images; its compression adds noticeable artifacts to diagrams,
text, and other man-made images. PNG uses a lossless compression
algorithm that is more appropriate for these kinds of images.
2. JPEG
allows only the specification of full-color (RGB) images. It
does not include any transparency information nor does it support
luminance images (except as full-color images that just happen
to contain only shades of gray). PNG supports one- two- three-,
and four-component images.
3. PNG
is new and, as of early 1997, is not yet widely supported. JPEG
is much more common.
Browsers
should interpret PNG's transparency color and gray-scale color
maps as just descibed for GIF images.
|
| TIP:
DEF/USE textures: ImageTextures and MovieTextures should
be instanced using DEF/USE whenever possible. Remember that
ImageTextures often represent the largest percentage of a scene's
file size and should be kept as small as possible without hurting
image quality. Instanced ImageTextures can reduce download time
and increase rendering speed. |
TIP:
Turn off lighting when using textures:
To increase texture performance in cases when the lighting is
not important or required, do not specify a Material node. This
will instruct the browser to turn off the lighting calculations
and render the geometry with the exact colors found in the texture
map (and ignore the light sources in the scene and thus speed
up rendering). This is especially useful for light-emitting
surfaces, such as a television or movie screen, and for prelit
surfaces, such as a wall with the lighting effects painted into
the texture map, rather than computed by the browser (this effect
is common in most 3D games). Here's a simple example of an object
with no Material and thus no lighting computations:
     #VRML V2.0 utf8
     Shape {    # no Material --> turns off lighting
       appearance Appearance {
         texture ImageTexture { url "test.mpeg" }
       }
       geometry Box {}
     }
|
TIP:
Limit texture map size whenever
possible: Texture maps often represent the largest aspect
of your VRML file size. Therefore, to reduce download time it
is critical to find ways to reduce texture map size. The obvious
first step is to restrict your texture maps to the smallest
resolution that still renders adequately. Another factor is
to use one-component (gray-scale) textures whenever possible.
Remember that the Material node's diffuseColor and the
Color node tints one-component textures. For example, to create
a green grass texture, create a small, repeatable (left-right
and top-bottom edges match) gray-scale texture and apply a Material
node or Color node with greenish color:
     Shape {
       texture ImageTexture { url "grass.png" }
       material Material { diffuseColor 0.1 0.8 0.2 }
       geometry ...
     }
Note
that in order to use one-component textures and to turn lighting
off, you can use an IndexedFaceSet with colorPerVertex FALSE
(i.e., colors applied per face) and a Color node to tint
the texture:
     Shape {
       texture ImageTexture { url "grass.png" }
       # no material specified --> turns off lighting calculations
       geometry IndexedFaceSet {
         coord Coordinate { point [ ... ] }
         coordIndex [ ... ]
         texcoord TextureCoordinate { point [ ... ] }
         colorPerVertex FALSE               # color per face
         color Color { color 0.1 0.8 0.2 }  # green-ish color
         colorIndex [ 0 0 0 ... ]  # use same Color value for faces
       }
     }
If you
want to vary the color at each vertex or face (e.g., to add
hue randomness), specify a list of different colors and apply
to each vertex.
|
|
TIP:
Beware of texture size limitations: It is critical
to be aware of the specific texture mapping restrictions imposed
by the rendering library of the each browser that you intend
to use. For example, some rendering libraries require that
all texture maps fit into a 128 x 128 resolution. Browsers
will automatically filter all texture maps to this size, but
produce blurry textures and waste valuable download time.
Some rendering libraries require that the texture map's resolution
be a power of two (e.g., 32, 64, 128). A conservative
approach is to design your texture maps in the 128 x 128 or
256 x 256 resolution. Carefully read the release notes of
the browsers that you intend to use before wasting your time
on high-resolution textures.
Keep
in mind that if the browser (i.e., the underlying rendering
library) requires texture maps at a specific resolution (e.g.,
128 x 128) and you provide a texture map at 64 x 128, you
will have wasted half of the texture memory. Therefore, to
maximize performance, use as much of the required texture
resolution for the actual texture maps by combining smaller
textures into a single texture map and use TextureCoordinates
to map the individual objects to their appropriate subtextures.
For example, imagine that you have one medium-size texture
that represents a corporate sign, and smaller size textures
that represent small signs or repeating textures in the scene,
such as stone, grass, bricks, and so forth. You can combine
many textures into a single texture map and allocate proportional
amounts as you see fit (Figure 3-29). Note, however, that
combining multiple textures into one image interacts badly
with a rendering technique called mip-mapping. Mip-mapping
relies on the creation of low-resolution versions of the texture
image; these low-resolution versions are displayed when the
texture is far away. If there are multiple texture maps in
the original image, the automatically created low-resolution
images will not be correct--colors from different maps will
be averaged together. A similar problem can occur if you use
JPEG compression, which works on blocks of pixels. Pixels
from the different maps in the image may be compressed together,
resulting in errors along the edges of the individual texture
maps.
|
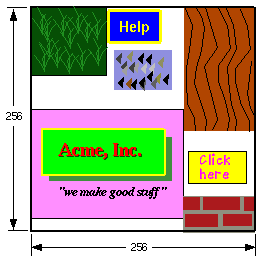
Figure 3-29: Combining Subtextures into a Single
Texture Map
| TIP:
Use repeating textures to reduce file size: When building
textures that are repeatable (e.g., grass, stone, bricks), create
the smallest possible pattern that is repeatable without being
obvious and ensure that the edges of the texture blend properly
since the right edge of the texture will abut with the left
edge and the top edge will abut with the bottom edge when repeated.
Most paint and image-processing tools support this feature.
|
| TIP:
The term clamping means that the border pixels are used
everywhere outside the range 0 to 1 and create a "frame" effect
around the texture. |
|
TIP:
In general, if you are applying a nonrepeating texture to
a polygon, the texture should have at least a one-pixel-wide
constant-color border. That border pixel will be smeared across
the polygon wherever the texture coordinates fall out of the
0 to 1 range.
Transparent
textures in VRML act as "cookie cutters"--wherever the texture
is fully transparent, you will be able to see through the
object. An alternative is decal textures, with the underlying
object material (or color) showing wherever the texture is
fully transparent. Decal textures are not directly supported,
but can be created using two different textures as follows:
A mask must made from the full-color, four-component texture.
The mask must be opaque wherever the full-color texture is
transparent, and transparent wherever the full-color texture
is opaque, with a constant intensity of 1.0. The full-color
texture is applied to the geometry to draw the textured parts
of the object. The mask is also applied to the geometry, effectively
drawing the nontextured parts of the object. A two-component
texture with a constant intensity of 1.0 is equivalent to
a transparency-only texture map--the diffuse colors used for
lighting are multiplied by 1.0, so the texture's intensity
has no effect. This might be prototyped as follows:
     PROTO DecalShape [
       exposedField MFString texture [ ]
       exposedField MFString mask [ ]
       exposedField SFNode geometry NULL
       exposedField SFNode material NULL  ]
     {
       Group { children [
         Shape {
           appearance Appearance {
             texture ImageTexture { url IS texture }
             material IS material
           }
           geometry IS geometry
         }
         Shape {
           appearance Appearance {
             texture ImageTexture { url IS mask }
             material IS material
           }
           geometry IS geometry
         }
       ]}
     }
The
cokie cutter texturing behavior was chosen because it is more
common than decaling and because decaling can be done using
two cookie cutter textures, while the opposite is not true.
|
|
EXAMPLE
(click to run):
The following example illustrates the ImageTexture node
(see Figure 3-30). The first ImageTexture is a one-component
(gray-scale) image that shows how diffuseColor of
the Material and one-component textures multiply. The second
ImageTexture shows a three-component image and illustrates
how the diffuseColor is ignored in this case. The
third ImageTexture shows how a four-component image (or
an image with transparency) can be used to create semitransparent
texturing. The fourth ImageTexture shows the effect of the
repeatS and repeatT fields:
#VRML V2.0 utf8
Group { children [
  Transform {
    translation -2.5 0 0.5
    rotation 0 1 0 0.5
    children Shape {
      appearance Appearance { # 1-comp image(grayscale)
        texture ImageTexture { url "marble.gif" }
        material DEF M Material {
          # Diffuse multiplies image values resulting
          # in a dark texture
          diffuseColor .7 .7 .7
        }
      }
      geometry DEF IFS IndexedFaceSet {
        coord Coordinate {
          point [ -1.1 -1 0, 1 -1 0, 1 1 0, -1.1 1 0 ]
        }
        coordIndex [ 0 1 2 3 ]
      }
    }
  }
  Transform {
    translation 0 0 0
    children Shape {
        appearance Appearance { # image RGBs REPLACE diffuse
        texture ImageTexture {
          url "marbleRGB.gif"
        }
        material DEF M Material {
          diffuseColor 0 0 1 # Diffuse - no affect!
          shininess  0.5     # Other fields work
          ambientIntensity 0.0
        }
      }
      geometry USE IFS
    }
  }
  Transform {
    translation 2.5 0 0
    children Shape {
      appearance Appearance {
        # RGBA values REPLACE diffuse/transp
        texture ImageTexture { url "marbleRGBA.gif" }
        material DEF M Material {
          # Diffuse and transp have no effect;
          # replaced by image values.
          # All other fields work fine.
          diffuseColor 0 0 0
          transparency 1.0
          shininess  0.5
          ambientIntensity 0.0
        }
      }
      geometry USE IFS
    }
  }
 Transform {
    translation 5 0 0.5
    rotation 0 1 0 -0.5
    children Shape {
      appearance Appearance {
        # Illustrates effect of repeat fields
        texture ImageTexture {
          url "marble.gif"
          repeatS FALSE
          repeatT FALSE
        }
                material DEF M Material { diffuseColor 1 1 1 }
      }
      geometry IndexedFaceSet {
        coord Coordinate {
          point [ -1 -1 0, 1 -1 0, 1 1 0, -1 1 0 ]
        }
        coordIndex [ 0 1 2 3 ]
        texCoord TextureCoordinate {
            point [ -0.25 -0.5, 1.25 -0.5, 1.25 1.5, -0.25 1.5 ]
        }
      }
    }
  }
  Background {
    skyColor [ 1 1 1, 1 1 1, .5 .5 .5, 1 1 1, .2 .2 .2, 1 1 1 ]
    skyAngle [ 1.35, 1.4, 1.45, 1.5, 1.55 ]
    groundColor [ 1 1 1, 1 1 1, 0.4 0.4 0.4 ]
    groundAngle [ 1.3, 1.57 ]
  }
]}
|
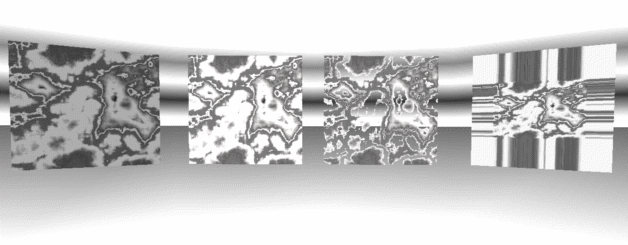
Figure 3-30: Examples of ImageTexture Node
|